This section is NSFW – Not Safe For Wanking.
It contains a lot of mathematics, numbers, analyses & testing that can be difficult to find titillating.
You’ll find the analysis & Guide to the Level Mod, Speed, Move Order, Stalling & Criticals here. There is a short version for those who’re scared of math, and a detailed guide for people who want to learn how to break the game.
Level Mod
Short version: Recommend level is not a suggestion – for some battles it’s the only way you stand a chance. Anything >3 levels will result in massively increased incoming DPS & reduced outgoing DPS. If you’re 10 levels lower, you essentially deal half damage and take double damage.
The Level Mod is how the devs made the game much harder than has any right to be.
Basically, the reason why there is a sudden spike in DPS from the enemy team is not due to their stats being better, but simply because they are at a higher level than you.
The Level Mod goes both ways – you deal less damage and take more damage at a lower level, but once you start outlevelling the enemy team you’ll easily crush them.
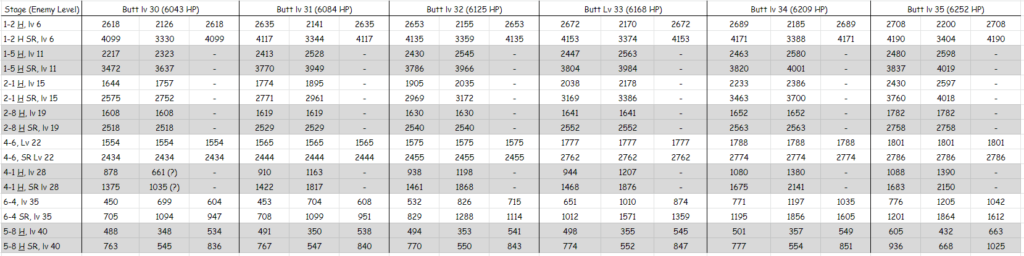
The best example for this is none other than Butterfly Dream. Butterfly Dream’s Ultimate scales off her max HP, which makes calculating how much damage she can deal extremely easy.
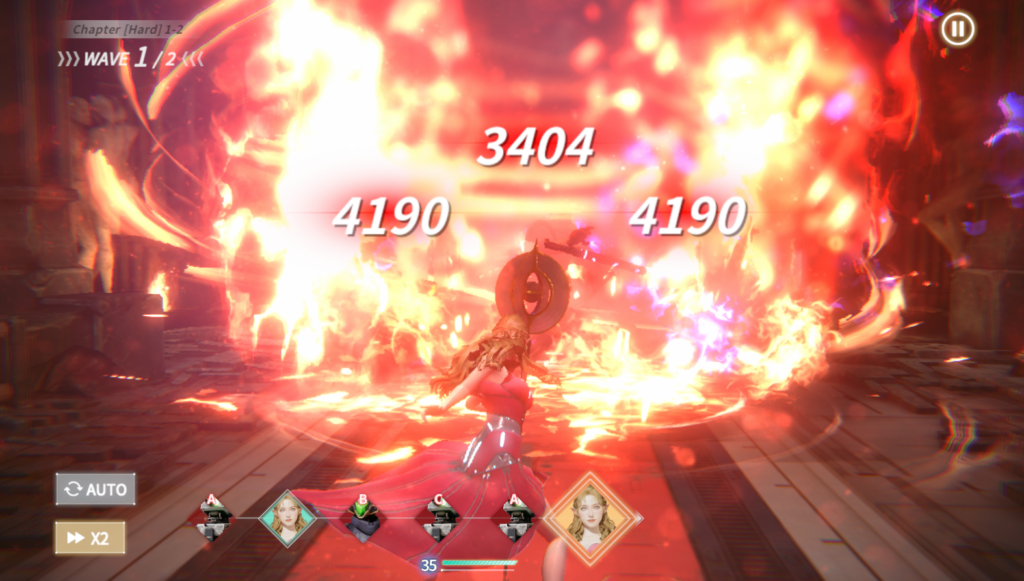
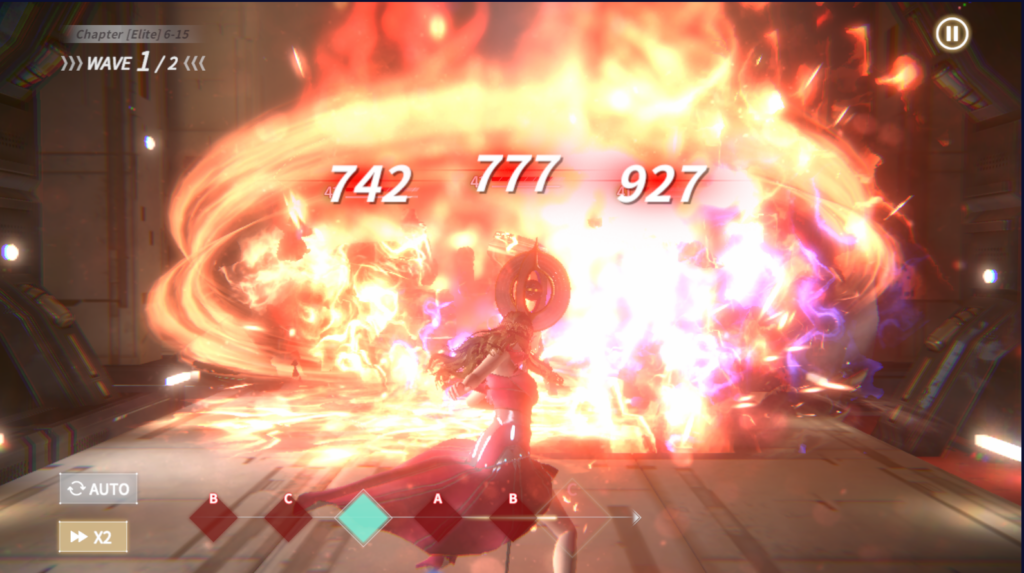
She had the exact same Gear setup & Relic equipped for both encounters. The difference in damage here is purely due to the Level Mod taking effect, and serves to demonstrate how significant the Level Mod is.
This is also why she feels so weak in the early game, because literally everything is overlevelled relative to her at the start of the game.
Note that this affects all Personas equally. Timekeeper does amazing damage despite the Level Mod, and completely breaks the game because of it.
Based on my findings, the Level Mod does not come into effect at level ±3. This is where fights are ‘fair’.
Anything beyond this is affected by the Level Mod, to the point where you’re looking at a nearly 2x modifier on all incoming and outgoing dps at a 10 level difference.

Speed
Short version: A.SPD has a bigger effect on move order than SPD.
All Personas have 20.00% A.SPD by default. Increasing this amount has a very noticeable effect on move order, and generally speaking will guarantee the Persona will go first unless there is either a huge disparity in base SPD.
The exact formula is still unknown, if you have a discovery let me know, I need help.
Speed is nice to have, but it is basically guaranteed that the enemy team will almost always get the opening attack at the start of a battle.
Move Order
Short version: None, read the damn thing in its entirety for once in your life.
Some Personas benefit from going first, e.g. Crusader, Healers, etc. Some benefit from going last, i.e. most Support Personas that can buff the party.
Most Personas generally have no real preference, and really don’t care about move order.
You should though. Move order is maintained between waves, meaning that it is in your best interest to optimise your moves and try to finish off every wave on your first move.

This is pretty obvious, but this is something to take into consideration regarding your move order. Personally, I make it a point to get Timekeeper to be 2nd or 3rd so she has the chance to delete an enemy unit when the next wave starts.
Another thing to note is that buffs do carry over to the next wave Normally I wouldn’t feel the need to tell you that debuffs do not persist into the next stage for obvious reasons, but the Discord has ruined whatever faith I previously had. Yeah, I’m calling you out here. You know who you are.
Stalling
Short version: Cooldown & Auto Bad.
In Manual mode, you can stall for time before the next wave by using only weak attacks. Keep one durable but weak enemy alive and use only basic attacks to finish the cooldowns. You can also manipulate the move order like this as well, ideally setting things up so that a Support Persona lands the finishing blow, letting your DPS alpha strike the next wave.
Criticals (C.DMG)
Short version: Personally, ATK Gear > Crit Gear. Critical Hits deal 1.2x damage by default, increased additively with C.DMG% Gear & Relics, and can potentially reach >2x damage.
C.DMG has nothing to do with CRTR. Check with the Stats Explained page what they do.
The crit rate (CRTR) is extremely low and completely random. There are a few formulas laying around, but none has been confirmed, and I really don’t have the means to reliably test this.
C.DMG is very simple and straightforward. By default, you will deal 120% damage at 0% C.DMG relative to a regular hit. All attacks can land a hit, even Ultimate Attacks.
C.DMG% is purely additive. For example, a piece of Gear with 10% C.DMG will simply add 10% to the total damage, so you will deal 130% damage.
With a full set of C.DMG Gear and the best attributes, you can get over 200% critical damage, essentially doubling your damage on a Critical Hit.
Base 120% + 15% Relic + 2 x 20% C.DMG Gear Attributes + 25% Crush Set Bonus = 200% C.DMG
(Me, 2022)
2x Damage sounds nice, but even if it happens 10% of the time you’ve only increased your DPS by 10%. Compare this to just increasing your ATK, which gives a net increase to DPS that has the exact same chance to Crit, and overall deals more damage.